Setting up mini projectors
can transform your living space into a personal theater, allowing for versatile
entertainment experiences. To achieve the best viewing, understanding the
optimal setup is essential. From selecting the right location to adjusting
settings, each step impacts the quality of your projection. Whether you are
hosting a movie night or delivering a presentation, these guidelines will help
you maximize your mini projector’s potential. Let’s delve into the key aspects
of setting up your projector, including placement, screen selection, and
technical adjustments, ensuring you enjoy clear and vibrant displays every
time.

What
Is the Best Place to Set Up Your Mini Projector?
Finding
the Right Location
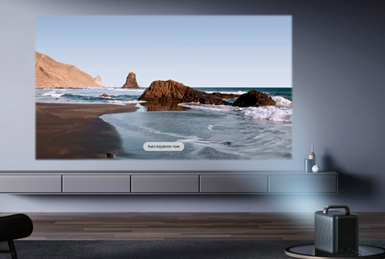
Choosing the ideal location for your mini projector involves several
considerations to enhance image clarity and size. The distance between the
projector and the screen, known as throw distance, is crucial. Most mini
projectors have a short throw, meaning they can display large images from a
short distance. Position the projector at a level that aligns with the center
of the screen to avoid distortion. Ensure the surface is stable to prevent
movement. Also, check the angle; the projector should be perpendicular to the
screen for the best results. Experiment with different placements to find the
optimal setup that fits your space.
Considerations
for Ambient Lighting
Ambient lighting significantly affects the quality of your
projection. Ideally, the room should be as dark as possible to enhance image
contrast and brightness. If a dark room isn't an option, use blackout curtains
to minimize light interference. The position of windows and light sources can
create glare, so arrange the projector and screen to minimize these effects.
Consider using ambient light-rejecting screens, which are designed to reduce
the impact of surrounding light. By controlling the ambient lighting
conditions, you can ensure that your projector displays crisp and clear images,
even in less-than-ideal settings.
How to
Choose the Right Screen for Your Mini Projector
Screen
Size and Material Options
Selecting the right screen size is vital for an immersive viewing
experience. The screen should be large enough to fill your field of vision
without requiring excessive eye movement. Measure your room to determine the
maximum screen size that fits comfortably. Material options vary; white screens
offer neutral color and brightness, while gray screens enhance contrast in
rooms with ambient light. Gain refers to a screen's reflectivity—a higher gain
means more brightness but narrower viewing angles. Evaluate the room's
characteristics and projector specifications to choose the screen material that
complements your viewing environment.
Fixed
vs. Portable Screens
Deciding between a fixed or portable screen depends on your space
and usage needs. Fixed screens provide a permanent, flat surface ideal for
dedicated viewing areas, offering consistent quality without setup hassle. They
often deliver better image quality due to tensioned surfaces that minimize
wrinkles. Portable screens are versatile, allowing for easy transport and setup
in different locations. They're perfect for those who need flexibility and
don't have a dedicated projection area. Consider how often you’ll move your
projector and where you’ll use it when choosing between these options to ensure
you have the right screen for your lifestyle.
How to
Adjust Your Mini Projector Settings for Optimal Viewing
Brightness,
Contrast, and Color Calibration
Fine-tuning your projector’s settings can dramatically enhance image
quality. Start by adjusting the brightness to suit the ambient lighting;
brighter settings are needed for well-lit rooms. Contrast settings impact the
difference between the darkest and lightest parts of the image; increase
contrast to make images pop in dim lighting. Color calibration ensures that the
colors displayed are accurate and vibrant. Use test images or calibration tools
to adjust colors, making reds, blues, and greens appear natural. Spend time
experimenting with these settings to achieve a balanced image that meets your
viewing preferences.
Keystone
Correction and Focus Adjustment
Keystone correction is essential for eliminating image distortion
caused by projecting at an angle. Most mini projectors offer automatic or
manual keystone adjustments; use these to square the image to the screen. Focus
adjustment ensures that the image is sharp and clear. Start by projecting an
image and adjusting the focus ring or lever until the picture is crisp. If your
projector has manual focus, fine-tune it while watching content to get the best
clarity. These adjustments can make a significant difference in the viewing
experience, turning a blurry image into a sharp and detailed presentation.
Tips
for Enhancing Audio Quality with Mini Projectors
Selecting
the Right Audio Equipment
Audio quality is as important as visual clarity for an immersive
experience. Mini projectors often have built-in speakers, but external speakers
or sound systems provide superior sound. Consider portable Bluetooth speakers
for convenience and ease of setup. Soundbars are a great choice for enhanced
audio without the complexity of a full surround system. The Capsule Air, for
example, offers integrated speakers, but pairing it with an external speaker
can dramatically improve sound quality. Evaluate the audio equipment based on
your room size and personal preference to ensure that the sound matches the
visual excellence of your setup.

Audio
Settings for Clear Sound
Adjusting audio settings can enhance clarity and overall sound
quality. Start by ensuring your projector’s volume settings are balanced; avoid
maximum volume to prevent distortion. Check the equalizer settings on your
speakers or sound system to tailor the audio to your preference, enhancing bass
or treble as needed. Placement of speakers is crucial; position them at ear
level for direct sound. Experiment with different settings and arrangements to
find what works best in your environment. These adjustments will ensure that
the audio complements the visuals, creating an engaging and immersive viewing
experience.
Conclusion
Setting up a mini projector for optimal viewing involves a careful balance of location, screen selection, and settings adjustments. By understanding and implementing these tips, you can ensure a superior projection experience that enhances both image and sound quality. Whether for personal enjoyment or professional use, the right setup transforms how you view and interact with projected content. Prioritize these factors to fully realize the potential of your mini projector, creating a seamless and captivating viewing environment every time.


